


 Infiniti QX: Around ViewTM Monitor
When you push the CAMERA button or shift
the selector lever into the R (Reverse)
position while the ignition switch is in the
ON position, the Around View Monitor
operates. The monitor displays various
views of the position of the vehicle.
Available views:
► Bird-Eye View
The surrounding view of the vehicle.
► Front-Side View
The view around and ahead of the front
passenger’s side wheel.
► Front View
The view to the front of the vehicle.
► Rearview
The view to the rear of the vehicle.
► Rear-Wide View
An approximately 180-degree view of
the rear of the vehicle.
The system is designed as an aid to the
driver in situations such as slot parking or
parallel parking.
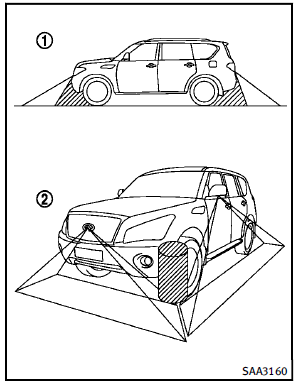
There are some areas where the system will not detect objects. When in the front or the rearview display, an object below the bumper or on the ground may not be detected 1 . When in the bird-eye view, a tall object near the seam of the camera detecting areas will not appear in the monitor 2 .
 WARNING
► The Around View Monitor is a convenience
but it is not a substitute for proper
vehicle operation because it has areas
where objects cannot be viewed. Always
look out the windows and check mirrors
to be sure that it is safe to move before
operating the vehicle. Always operate
the vehicle slowly.
► Do not use the Around View Monitor with
the outside mirror in the stored position,
and make sure that the lift gate is
securely closed when operating the
vehicle using the Around View Monitor.
► The distance between objects viewed on
the Around View Monitor differs from the
actual distance.
► The cameras are installed above the
front grille, the outside mirrors and
above the rear license plate. Do not put
anything on the cameras.
► When washing the vehicle with highpressure
water, be sure not to spray it
around the cameras. Otherwise, water
may enter the camera unit causing water condensation on the lens, a malfunction,
fire or an electric shock.
► Do not strike the cameras. They are
precision instruments. Doing so could
cause a malfunction or cause damage
resulting in a fire or an electric shock.
 CAUTION
Do not scratch the lens when cleaning dirt
or snow from the front of the camera.
NOTE:
The color of the view on the Around View Monitor display is different from the actual view because the system uses infrared cameras.
 Shift the selector lever
 Select the “Wide”, “Side” or
“Top” key on the
screen.
Select the “Wide”, “Side” or
“Top” key on the
screen.
 Push the CAMERA button
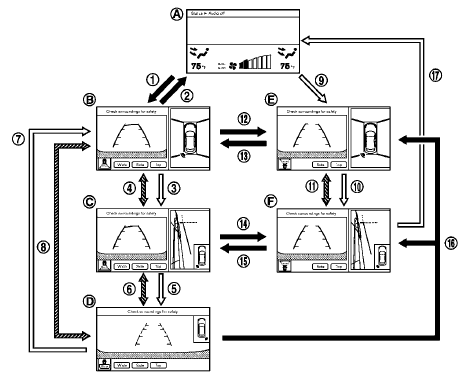
A : Original screen before the Around
View Monitor is operated
B : Rear view/bird-eye view screen
C : Rear view/front-side view screen
D : Rear-wide view screen
E : Front view/bird-eye view screen
F : Front view/front-side view screen
- How to switch the display
- How to see each view
- Difference between predicted and actual distances
- Camera aiding corner sonar function
- How to adjust the screen view
- Around ViewTM Monitor settings
- Operating tips
 How to use SETTING button
The display as illustrated will appear when
the SETTING button is pushed.
For navigation settings, refer to the separate
Navigation System Owner’s Manual.
Audio settings
The display as i ...
 How to switch the display
The Around View Monitor display consists
of the left and the right screens. You can
see a combination of different views on the
screens as illustrated above.
Starting with the selector lever op ...
See also:
Storage Compartments
For vehicles with a second row center console, press the buttons (B) or (C) to
access storage areas.
Lift up on (A) for additional storage area.
See Floor Console Storage . ...
Overview RSE Base System
Some DVDs do not allow fast forwarding or skipping of the copyright information
or previews. If the DVD does not begin playing at the main title, refer to the on-screen
instructions.
The DVD player ...
Grade Braking
The Grade Braking shift modes can be activated by pressing the button on the
end of the shift control lever. While in Range Selection Mode, Grade Braking is
deactivated allowing the driver to select ...