


 Mercedes-Benz GL-Class: Adjusting the headlamps
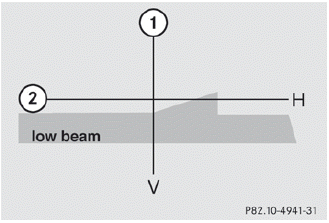
1 V vertical axis
2 H (horizontal) height, measured from the
center
Setting the headlamps correctly is extremely important. Setting the high-beam headlamps also sets the low-beam headlamps. (The term headlamps covers both high and low beam.) To check and adapt the headlamp setting, proceed as follows:
► Park the vehicle on level ground at a
distance of 25 feet (7.6 m) from a wall or
similar.
► Make sure that the vehicle load is in the
normal range.
► Switch on the low-beam headlamps
 .
.
If the light of the headlamps is not distributed
as shown in the illustration above, follow the
instructions below:
► Open the hood.
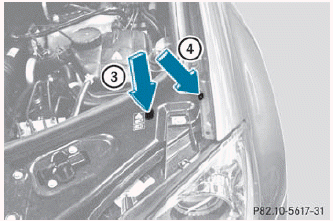
The adjustment screws are located under the cover.
► Insert a suitable tool into the openings in the cover. The directions of arrow 3 and 4 indicate the angle at which the tool needs to be inserted in order to reach the adjustment screws.
► Turn both screws uniformly until the vertical setting of the headlamp corresponds to 1. Turn the screws clockwise to adjust the headlamp upwards and counter-clockwise to adjust it downwards.
Gradation:
• Screw at arrow =: 0.67˚ angle of
inclination
• Screw at arrow?: 0.50˚ angle of
inclination
The left and right headlamps need to be adjusted individually.
 If it is not possible to adjust the
headlamps accurately, have the
adjustment performed at an authorized
Mercedes-Benz Center.
If it is not possible to adjust the
headlamps accurately, have the
adjustment performed at an authorized
Mercedes-Benz Center.
 License plate lamps
► Switch off the lights.
► Open the tailgate.
► Remove screws 1.
► Remove the license plate lamp.
► Replace the bulb.
► Insert the license plate lamp.
υ ...

See also:
Roof rack
Always distribute the luggage evenly on
the roof rack. Do not load more than 221 lb
(100 kg) on the roof rails. Observe the
maximum load limit shown on the crossbars
or roof carriers when yo ...
Audio/Video (A/V) Jacks
A. Yellow: Video Input
B. White: Left Audio Input
C. Red: Right Audio Input
The A/V jacks are color coded to match typical home entertainment system equipment.
The A/V jacks, located on the rear ...
Emergency brake assist (EBA)
If the driver rapidly applies the brakes, EBA automatically boosts the braking
force to its maximum, in order to bring the vehicle to a halt as quickly as possible.
If the driver applies the brake ...