


 Cadillac Escalade: Trailer Wiring Harness
Heavy-Duty Trailer Wiring Harness Package
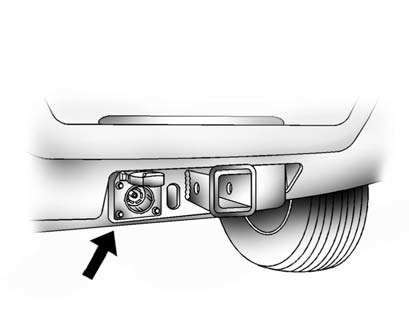
The vehicle has a seven-pin universal heavy-duty trailer connector attached to the rear bumper beam next to the integrated trailer hitch.
The seven-wire harness contains the following trailer circuits:
- Yellow: Left Stop/Turn Signal
- Dark Green: Right Stop/Turn Signal
- Brown: Taillamps
- White: Ground
- Light Green: Back-up Lamps
- Red: Battery Feed*
- Dark Blue: Trailer Brake*
*The fuses for these two circuits are installed in the underhood electrical center, but the wires are not connected. They should be connected by your dealer or a qualified service center.
If charging a remote (non-vehicle) battery, press the tow/haul mode button located at the end of the shift lever. This will boost the vehicle system voltage and properly charge the battery. If the trailer is too light for tow/haul mode, turn on the headlamps as a second way to boost the vehicle system and charge the battery.
 Trailer Brakes
A loaded trailer that weighs more than 900 kg (2,000 lbs) needs to have its own
brake system that is adequate for the weight of the trailer. Be sure to read and
follow the instructions for the trail ...
 Electric Brake Control Wiring Provisions
These wiring provisions are included with the vehicle as part of the trailer
wiring package. These provisions are for an electric brake controller. The instrument
panel contains blunt cut wires near ...
See also:
Power steering fluid
Check the fluid level in the reservoir.
The fluid level should be checked using the
HOT range (1 : HOT MAX., 2 : HOT MIN.).
at fluid temperatures of 122 to 1768F (50
to 808C) or using the CO ...
When reading the manual
This manual includes information for all
options available on this model. Therefore,
you may find some information that does
not apply to your vehicle.
All information, specifications and illu ...
Recirculation
When selected, the air is inside of the screen. recirculated inside the vehicle.
This helps to maintain a high or low temperature, and is useful for preventing fumes
entering the vehicle.
Note: ...