


 Mercedes-Benz GL-Class: TIREFIT kit version 1
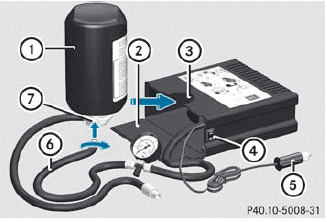
► Open flap 2.
► Pull connector 5 with the cable and hose
6 out of the housing.
► Screw hose 6 onto flange 7 of tire
sealant bottle 1.
► Insert tire sealant bottle : head
downwards into recess 3 of the tire
inflation compressor.
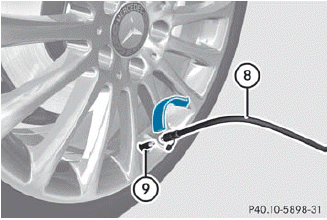
► Remove the cap from valve 9 on the faulty tire.
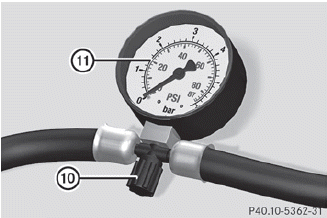
► Make sure pressure release screw 10 on
pressure gauge 11 is fully closed.
► Screw filler hose 8 onto valve 9.
► Insert connector 5 into the socket in the
footwell of the second row of seats.
![]() None of the other sockets or cigarette
lighters are designed for operating the tire
inflation compressor.
None of the other sockets or cigarette
lighters are designed for operating the tire
inflation compressor.
► Turn the SmartKey to position
1() in the ignition lock.
► Press on/off switch ? on the tire
inflation
compressor to I.
The tire inflation compressor is switched on. The tire is inflated.
 First, TIREFIT is pumped into the tire. The
pressure can briefly rise to approximately
500 kPa (5 bar/73 psi).
First, TIREFIT is pumped into the tire. The
pressure can briefly rise to approximately
500 kPa (5 bar/73 psi).
Do not switch off the tire inflation compressor during this phase.
► Allow the tire inflation compressor to run for five minutes. The tire should then have attained a pressure of at least 180 kPa (1.8 bar/26 psi).
![]() Do not operate the tire inflation
compressor for longer than eight minutes
at a time without a break. It may otherwise
overheat.
Do not operate the tire inflation
compressor for longer than eight minutes
at a time without a break. It may otherwise
overheat.
The tire inflation compressor can be operated again once it has cooled down.
If a pressure of 180 kPa (1.8 bar/26 psi) has been achieved after five minutes, see.
If a pressure of 180 kPa (1.8 bar/26 psi) has not been achieved after five minutes, see.
 Using the TIREFIT kit
You can use the TIREFIT kit to seal small
punctures, particularly those in the tire tread.
You can use TIREFIT at outside temperatures
down to -4 °F (-20 °C).
WARNING
TIREFIT is a ...
 TIREFIT kit version 2
► Pull connector 4 with the cable and
hose
5 out of the housing.
► Screw hose 5 onto flange 6 of tire
sealant bottle 1.
► Insert tire sealant bottle 1 head
downwards into re ...
See also:
Navigation
OnStar navigation requires the Directions and Connections service plan.
Push to receive directions or have
them sent to the vehicle navigation screen. Destinations can also be forwarded to
the v ...
Halogen Bulbs
WARNING
Halogen bulbs have pressurized gas inside and can burst if you drop or scratch
the bulb. You or others could be injured. Be sure to read and follow the instructions
on the bulb package. ...
Low-beam headlamps
► To switch on the low-beam headlamps:
turn the SmartKey in the ignition lock to
position 2 or start the engine.
► Turn the light switch to
.
The indicator lamp in the
instru ...