



 Mercedes-Benz GL-Class: Setting the specified minimum distance
You can set the specified minimum distance for DISTRONIC by varying the time span between one and two seconds. This time span determines the distance that DISTRONIC should maintain from the vehicle in front, depending on the road speed. You can see this distance in the multifunction display.
WARNING 
It is up to the driver to exercise discretion to
select the appropriate setting given road
conditions, traffic, driver's preferred driving
style and applicable laws and driving
recommendations for safe following distance.
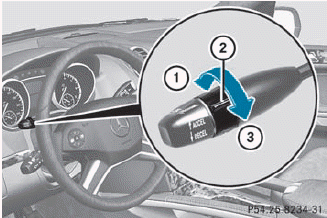
► To increase: turn thumbwheel 2 towards 3.
DISTRONIC then maintains a greater distance between your vehicle and the vehicle in front.
► To decrease: turn thumbwheel 2 towards 1.
DISTRONIC then maintains a shorter distance between your vehicle and the vehicle in front.
 Make sure that you maintain the
minimum distance to the vehicle in front as
required by law. Adjust the distance to the
vehicle in front if necessary.
Make sure that you maintain the
minimum distance to the vehicle in front as
required by law. Adjust the distance to the
vehicle in front if necessary.
 Storing the current speed or calling upthe last stored speed
WARNING
The set speed stored in memory should only
be set again if prevailing road conditions and
legal speed limits permit. Possible
acceleration or deceleration differences
arising ...
 DISTRONIC displays in thespeedometer
When DISTRONIC is activated, one or
two segments in the set speed range light up.
For design reasons, the speed displayed
in the speedometer may differ slightly from
the speed set for DISTRON ...
See also:
Power outlet
CAUTION
► Use power outlet with the engine running
to avoid discharging the vehicle
battery.
► Avoid using power outlet when the air
conditioner, headlights or rear window
de ...
Transmission Messages
ALL WHEEL DRIVE OFF
If your vehicle has the All-Wheel Drive (AWD) system, this message displays when
there is a compact spare tire on the vehicle, when the Antilock Brake System (ABS)
warning lig ...
Rear lamp removal
To change any of the rear bulbs, it is necessary to completely remove the lamp
unit from the vehicle.
1. With the tailgate open, remove the two screws from the inner edge of the unit.
2. Pull th ...


