


 Mercedes-Benz GL-Class: Folding the rear bench seat forwards
 If the driver's or front-passenger seat is
set for a larger person, it may not be
possible to fold the rear bench seat
forwards. In this case, move the front seats
as far forward as possible.
If the driver's or front-passenger seat is
set for a larger person, it may not be
possible to fold the rear bench seat
forwards. In this case, move the front seats
as far forward as possible.
► Move the head restraints to the lowest
position.
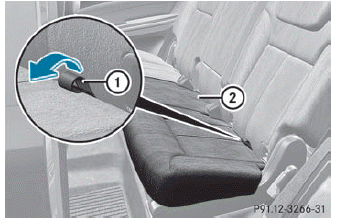
► Pull release loop 1 of seat cushion 2.
► Fold seat cushion 2 upwards.
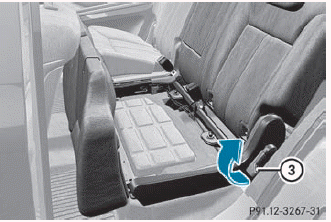
► Pull release catch 3 in the direction of the arrow.
The backrest is released.
![]() The backrest is heavy. Therefore, take
care when folding it down. Make sure that
the head restraints are pushed all the way
in so that the backrests and seat cushions
are not damaged.
The backrest is heavy. Therefore, take
care when folding it down. Make sure that
the head restraints are pushed all the way
in so that the backrests and seat cushions
are not damaged.
► Fold the backrest forwards until it engages in the cargo compartment position.
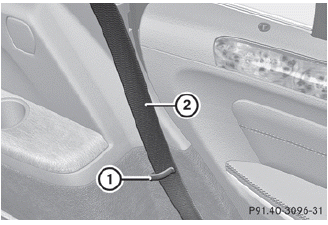
► Guide seat belts 2 under respective clips 1.
 Enlarging the cargo compartment
Important safety notes
WARNING
When expanding the cargo volume, always
fully fold the corresponding seats and, if so equipped, always use the cargo net
when
transporting cargo.
Unle ...
 Folding the rear bench seat back
► Pull release catch 3 upwards.
► Fold backrest 2 backwards until it
engages, making sure not to trap the seat
belts while doing so.
► Fold seat cushion 1 backwards and push
u ...
See also:
Adjusting the seats in the second andthird rows
Important safety notes
WARNING
Never travel in a moving vehicle with the seat
backrest in an excessively reclined position as
this can be dangerous. You could slide under
the seat bel ...
Tire Pressure Monitor Operation
This vehicle may have a Tire Pressure Monitor System (TPMS). The TPMS is designed
to warn the driver when a low tire pressure condition exists. TPMS sensors are mounted
onto each tire and wheel asse ...
Low oil pressure (red)
Illuminates as a bulb check when the ignition is switched on and extinguishes
when the engine is started. If the lamp remains on, flashes, or illuminates while
driving, stop the vehicle as soon ...