


 Mercedes-Benz GL-Class: Control panel for dual-zone automatic climate control
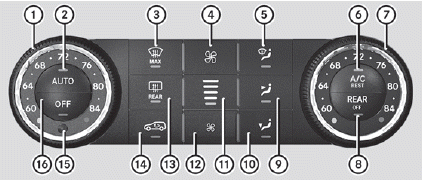
1 To set the temperature, left
2 To set climate control to automatic
3 To defrost the windshield
4 To increase the airflow
5 To direct the airflow through the defroster vents
6 To activate/deactivate cooling with air dehumidification
7 To set the temperature, right
8 To switch rear-compartment climate control on/off
9 To direct the airflow through the center and side air vents
10 To direct the airflow to the footwells and side air vents
11 To display the airflow level
12 To reduce the airflow
13 To switch the rear window defroster on/off
14 To activate/deactivate air-recirculation mode
15 Interior temperature sensor
16 To switch climate control on/off
 Important safety notes
WARNING
Severe conditions (e.g. strong air pollution) may require replacement of the
filter before
its scheduled replacement interval. A clogged
filter will reduce the air volume to t ...
 Notes on using dual-zone automaticclimate control
The following contains notes and
recommendations on optimum use of dualzone
automatic climate control.
• Activate climate control using the
and
buttons. The indicator lamps in the
and
b ...
See also:
Snow chains
For safety reasons, Mercedes-Benz
recommends that you only use snow chains
which have been specially approved for your
vehicle by Mercedes-Benz, or are of a
corresponding standard of quality.
...
Vehicle identification number (VIN)
The vehicle identification number (VIN) can
be found in the following locations:
• on the vehicle identification plate
• at the lower edge of the windshield
In addition to being stamped on the ...
Antilock Brake System (ABS) Warning Light
The ABS warning light comes on briefly when the ignition key is turned to ON/RUN.
This is normal.
If the light does not come on then, have it fixed so it will be ready to warn
you if there is a ...