


 Cadillac Escalade: Previous Destination
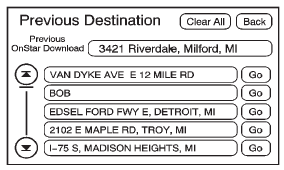
The previous destination entry method lets you select a destination from a list of previous destination points.
 Previous Destination: Press to access
the Previous Destination screen. The system stores up to 20 points that have been
previously entered. As new destinations are entered, the system automatically deletes
the oldest destinations and adds the new destinations.
Previous Destination: Press to access
the Previous Destination screen. The system stores up to 20 points that have been
previously entered. As new destinations are entered, the system automatically deletes
the oldest destinations and adds the new destinations.
To use the previous destination entry method:
1. Press DEST.
2. Press .
3. Select a previous destination from the list. Use the arrow to the right of the destination to view the entire destination name as necessary. Use the scroll arrows to the left to scroll through the list.
4. Press GO, located next to the destination. The map screen, with the destination marked displays.
5. Select the route preference for Fastest, Shortest, or Other. The system calculates and highlights the route.
6. Press Start Guidance. The route is now ready to be started. See “Getting Started on Your Route” in this section for more information.
 Address Book
The address book entry method lets you select a destination by selecting an address
that has been stored in the address book.
Address Book: Press to access the
Address Book screen. From this scr ...
 From Map
This destination entry method allows you to select a destination by scrolling
on the map.
From Map: Press to enter the From
Map destination entry method.
To use this destination entry method:
...
See also:
Vehicle Messages
Messages displayed on the DIC indicate the status of the vehicle or some action
may be needed to correct a condition. Multiple messages may appear one after another.
The messages that do not require ...
Cupholders
There are two cupholders, with removable liners, located in front of the center
console. There may be cupholders located in the second row seat armrest. To access,
pull the armrest down. There are ...
Unlocking the vehicle
WARNING
To prevent accidental or unauthorized operation, never leave the Smart Key unattended
in the vehicle. Never leave children or animals unattended in the vehicle. The vehicle
can be ...