


 Mercedes-Benz GL-Class: Inserting the mounting elements intothe loading rail
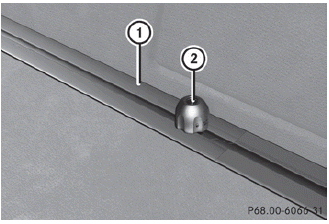
You can slide mounting element 2 in loading rail 1 to various detents and secure it. These detents are marked and positioned at 5-cm intervals along loading rail 1.
You can turn mounting element 2 of loading rail : to four positions:
 To lock the mounting element
 To release the cargo tie-down
ring, the
inertia reel or the telescopic rod
To release the cargo tie-down
ring, the
inertia reel or the telescopic rod
 To remove the mounting element
 To push the mounting element to
the
next detent
To push the mounting element to
the
next detent
► Turn mounting element 2 to
.
► Insert mounting element 2 into loading
rail 1.
► Turn mounting element 2 to
until
you feel it clearly engage in loading rail 1.
 Components and storage
The EASY-PACK load-securing kit allows you
to use your cargo compartment for a variety
of purposes. You can keep the EASY-PACK
load-securing kit in the bag supplied and store
it together with the ...
 Inserting the cargo tie down rings intothe mounting
WARNING
Distribute the load on the cargo tie down rings
evenly. Please observe the loading guidelines.
► Turn mounting element 2 in the loading
rail to .
► Insert cargo ...
See also:
Recreational Vehicle Towing
If the vehicle is a hybrid, see the hybrid supplement for more information.
Recreational vehicle towing means towing the vehicle behind another vehicle –
such as behind a motorhome. The two most c ...
Flexible seating
WARNING
► Never allow anyone to ride in the cargo
area or on the rear seats when they are
in the fold-down position. In a collision,
people riding in these areas without
proper restra ...
Distracted Driving
Distraction comes in many forms and can take your focus from the task of driving.
Exercise good judgment and do not let other activities divert your attention away
from the road. Many local governme ...