


 Infiniti QX: Forward-facing child restraint installation using LATCH
Refer to all Warnings and Cautions in the “Child safety” and “Child restraints” sections before installing a child restraint. Follow these steps to install a forwardfacing child restraint using the LATCH system: 1. Position the child restraint on the seat. Always follow the child restraint manufacturer’s instructions.
Forward-facing web-mounted — step 2
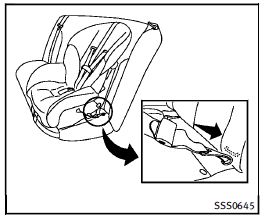
2. Secure the child restraint anchor attachments to the LATCH lower anchors. Check to make sure the LATCH attachment is properly attached to the lower anchors. If the child restraint is equipped with a top tether strap, route the top tether strap and secure the tether strap to the tether anchor point. See “Installing top tether strap” in this section. Do not install child restraints that require the use of a top tether strap in seating positions that do not have a top tether anchor.

Forward-facing rigid-mounted — step 3
3. The back of the child restraint should be secured against the vehicle seatback. If necessary, adjust or remove the head restraint or headrest to obtain the correct child restraint fit. If the head restraint or headrest is removed, store it in a secure place. Be sure to reinstall the head restraint or headrest when the child restraint is removed. See “Adjustable head restraint” or “Headrest” in this section for head restraint or headrest adjustment information. If the seating position does not have an adjustable head restraint or headrest and it is interfering with the proper child restraint fit, try another seating position or a different child restraint.
Forward-facing — step 4
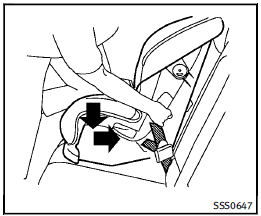
4. For child restraints that are equipped with webbing-mounted attachments, remove any additional slack from the anchor attachments. Press downward and rearward firmly in the center of the child restraint with your knee to compress the vehicle seat cushion and seatback while tightening the webbing of the anchor attachments. 5. Tighten the tether strap according to the manufacturer’s instructions to remove any slack.
Forward-facing — step 6
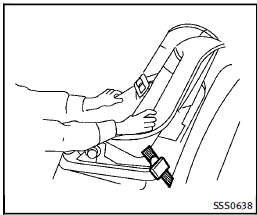
6. After attaching the child restraint, test it before you place the child in it. Push it from side to side while holding the child restraint near the LATCH attachment path. The child restraint should not move more than 1 inch (25 mm), from side to side. Try to tug it forward and check to see if the LATCH attachment holds the restraint in place. If the restraint is not secure, tighten the LATCH attachment as necessary, or put the restraint in another seat and test it again. You may need to try a different child restraint. Not all child restraints fit in all types of vehicles. 7. Check to make sure the child restraint is properly secured prior to each use. If the child restraint is loose, repeat steps 1 through 6.
 Rear-facing child restraint installation using the seat belts
WARNING
► The three-point seat belt with Automatic
Locking Retractor (ALR) must be used
when installing a child restraint. Failure
to use the ALR mode will result in the
child restr ...
 Forward-facing child restraint installation using the seat belts
WARNING
► The three-point seat belt with Automatic
Locking Retractor (ALR) must be used
when installing a child restraint. Failure
to use the ALR mode will result in the
child restrai ...
See also:
Reducing Speed While Using Cruise Control
If the cruise control system is already activated,
Press and hold the SET– button on the steering wheel until the desired
lower speed is reached, then release it.
To slow down in small amoun ...
Parking Brake
To set the parking brake, hold the regular brake pedal down, then push the parking
brake pedal down.
If the ignition is on, the brake system warning light will come on.
See Brake System Warning ...
Convex Mirrors
WARNING
A convex mirror can make things, like other vehicles, look farther away than
they really are. If you cut too sharply into the right lane, you could hit a vehicle
on the right. Check the i ...