


 Cadillac Escalade: Removing the Flat Tire and Installing the Spare Tire
1. Do a safety check before proceeding. See If a Tire Goes Flat for more information.
2. To remove the center cap, place the chiseled end of the wheel wrench in the slot on the wheel and gently pry the cap out.
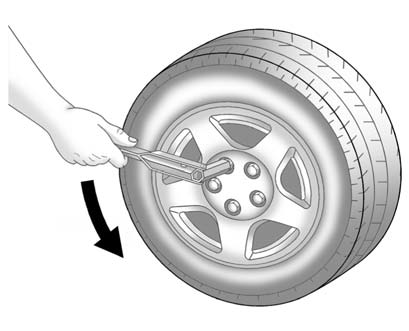
3. Use the wheel wrench to loosen all the wheel nuts. Turn the wheel wrench counterclockwise to loosen the wheel nuts. Do not remove the wheel nuts yet.
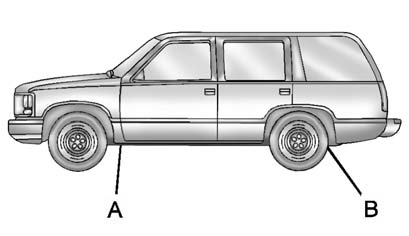
Jacking Locations (Overall View)
A. Front Position
B. Rear Position
![]() WARNING
WARNING
Getting under a vehicle when it is lifted on a jack is dangerous. If the vehicle slips off the jack, you could be badly injured or killed. Never get under a vehicle when it is supported only by a jack.
![]() WARNING
WARNING
Raising the vehicle with the jack improperly positioned can damage the vehicle and even make the vehicle fall. To help avoid personal injury and vehicle damage, be sure to fit the jack lift head into the proper location before raising the vehicle.
4. Position the jack under the vehicle as shown.
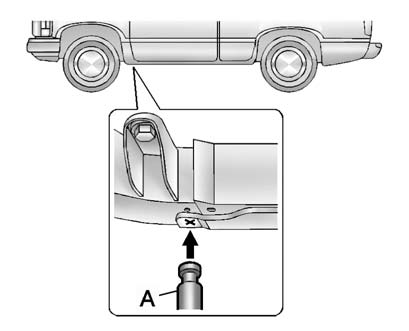
Front Position
Front Tire Flat: If the flat tire is on a front tire of the vehicle, use the jack handle and only one jack handle extension. Attach the wheel wrench to the jack handle extension. Attach the jack handle to the jack (A). Position the jack on the frame behind the flat tire where the frame sections overlap. Turn the wheel wrench clockwise to raise the vehicle. Raise the vehicle far enough off the ground so there is enough room for the spare tire to clear the ground.
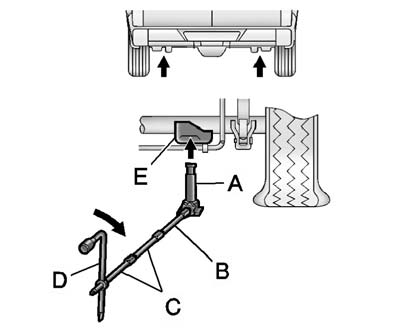
Rear Position
Rear Tire Flat: If the flat tire is on a rear tire of the vehicle, use the jack handle (B) and both jack handle extensions (C). Attach the wheel wrench (D) to the jack handle extensions (C). Attach the jack handle (B) to the jack (A). Use the jacking pad (E) provided on the rear axle. Turn the wheel wrench (D) clockwise to raise the vehicle. Raise the vehicle far enough off the ground so there is enough room for the spare tire to clear the ground.

5. Remove all of the wheel nuts.
6. Take off the flat tire.
![]() WARNING
WARNING
Rust or dirt on a wheel, or on the parts to which it is fastened, can make wheel nuts become loose after time. The wheel could come off and cause an accident. When changing a wheel, remove any rust or dirt from places where the wheel attaches to the vehicle. In an emergency, a cloth or a paper towel can be used; however, use a scraper or wire brush later to remove all rust or dirt.
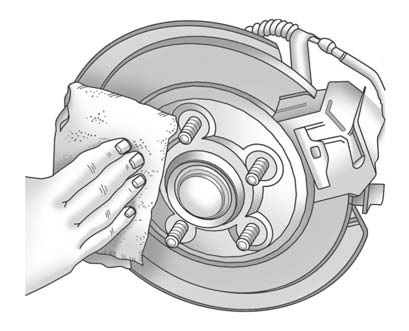
7. Remove any rust or dirt from the wheel bolts, mounting surfaces, and spare wheel.
![]() WARNING
WARNING
Never use oil or grease on bolts or nuts because the nuts might come loose. The vehicle's wheel could fall off, causing a crash.
8. Put the wheel nuts back on with the rounded end of the nuts toward the wheel after mounting the spare tire.
9. Tighten each wheel nut by hand. Then use the wheel wrench to tighten the nuts until the wheel is held against the hub.
10. Turn the wheel wrench counterclockwise to lower the vehicle. Lower the jack completely.
![]() WARNING
WARNING
Wheel nuts that are improperly or incorrectly tightened can cause the wheels to become loose or come off. The wheel nuts should be tightened with a torque wrench to the proper torque specification after replacing. Follow the torque specification supplied by the aftermarket manufacturer when using accessory locking wheel nuts. See Capacities and Specifications for original equipment wheel nut torque specifications.
Notice: Improperly tightened wheel nuts can lead to brake pulsation and rotor damage. To avoid expensive brake repairs, evenly tighten the wheel nuts in the proper sequence and to the proper torque specification. See Capacities and Specifications for the wheel nut torque specification.

11. Tighten the nuts firmly in a crisscross sequence as shown by turning the wheel wrench clockwise.
When reinstalling the regular wheel and tire, also reinstall the center cap. Line the tab on the back of the cap with the slot in the wheel. Place the cap on the wheel and press until it snaps into place.
 Removing the Spare Tire and Tools
The equipment needed to change a flat tire is stored under the storage tray,
located on the driver side trim panel, over the rear wheelhouse.
Regular Wheelbase Shown, Extended Wheelbase Similar.
...
 Storing a Flat or Spare Tire and Tools
Storing a jack, a tire, or other equipment in the passenger compartment of the
vehicle could cause injury. In a sudden stop or collision, loose equipment could
strike someone. Store all these in the ...
See also:
Power Seat Adjustment
WARNING
You can lose control of the vehicle if you try to adjust a driver seat while
the vehicle is moving. The sudden movement could startle and confuse you, or make
you push a pedal when you ...
When to Check and Change Automatic Transmission Fluid
It is usually not necessary to check the transmission fluid level. The only reason
for fluid loss is a transmission leak or overheating the transmission. If a small
leak is suspected, then use the f ...
Electronic brake force distribution (EBD)
EBD controls the balance of braking forces supplied to the front and rear wheels,
in order to maintain maximum braking efficiency.
If the vehicle has a light load (only the driver in the vehicle fo ...