


 Cadillac Escalade: Rear Seat Audio (RSA) System
The loading slot for the DVD player is located at the top of the head restraint. Insert the disc partially into the loading slot with the printed side facing the rear of the vehicle. The DVD player automatically draws the disc in, “Loading” displays on the screen along with a disc indicator, and playback starts. If the disc is inserted incorrectly, the DVD player ejects the disc and No Disc displays.
Some DVDs do not allow fast forwarding or skipping of the copyright information or previews. If the DVD does not begin playing at the main title, refer to the on-screen instructions.
The DVD player can be controlled by using the buttons located below the video display screen or by using the buttons on the system’s remote control. See “Remote Control” later for more information.
The following discs are compatible with the DVD player:
- DVD-Video: A DVD that has video.
- CD-DA: A CD that has music or sound content only.
- CD-Video: A CD that has a movie.
- CD-R/RW: A disc that has audio files such as CD-R with downloaded MP3 files, MPEG, or JPEG files.
The DVD player and discs are coded by global region. The DVD players are set to Region 1. Discs with other region codes will not work in the players.
If an error message displays on the video screen, see “DVD Messages” later in this section.
While the vehicle is moving, passengers should not unfasten their safety belts to make adjustments to the video screen control buttons. See Safety Belts . Use the remote control for any necessary adjustments. See “Remote Control” later in this section.
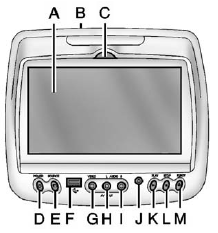
A. Video Screen
. Located behind the front seat headrest.
B. CD/DVD Slot
. The loading slot for the DVD player is located at the top of the head restraint. Insert the disc partially into the loading slot with the printed side facing the rear of the vehicle. The DVD player automatically draws the disc in, “Loading” displays on the screen along with a disc indicator, and playback starts. If the disc is inserted incorrectly, the DVD player ejects the disc and No Disc displays.
C. Level Lock and Release Latch
. The viewing angle of the video screen can be adjusted by releasing the latch and gently moving the screen. Then lock it into a secure position.
D. POWER O
. Press to turn the power on or off. Each video screen can be powered on or off independently.
E. SOURCE
. Press to select between Monitor 3, Monitor 4, or the AV INPUT. Each video display screen can be adjusted independently, as well as display information from both DVD players and both A/V inputs.
F. USB Port
. Connect USB drive to listen to music or view pictures. To charge devices, connect it to the USB port. Not all devices are able to be charged. For playback, the formats available are:
- JPEG
- JPG
- M2V
- MP3
- MPE
- MPEG-1
- MPEG-2
- MPEG-4
- MPG
- OGG
- WMA
- MWA
G. Video Input
. The yellow connector is used for video input.
H. Left Audio Input
. The white connector is used for the left side audio.
I. Right Audio Input
. The red connector is used for the right side audio.
J. 3.5mm (1/8 in) Output Jack
. Wired headphones can be plugged in with a 3.5mm (1/8 in) jack.
K. PLAY 
. Press this button located below the video display screen to start playback of a disc. On DVDs and video CDs with playback control (PBC), menu screens can display automatically. It might be necessary to press the play button again to begin play. There is a play position memory feature for DVD and video CD only. If the DVD player is turned off and then turned back on, the DVD player resumes playback where the disc stopped. The play position memory is erased if the disc is removed.
L. STOP 
. Press once to stop playing a DVD.
There is a pre-stop feature for DVD and video CD only. This feature resumes playback
of the disc where it was stopped. Press the stop button once during disc playback
and displays on the DVD startup screen.
This icon disappears after a few seconds. Press the stop button a second time,or
eject the disc, to cancel the pre-stop feature and to clear the disc position memory.
M. EJECT 
. Press to eject a disc from the DVD slot.
If a disc is ejected from the player, but not removed, it will automatically reload into the player. Another way to reload a disc that has been ejected, but not removed from the DVD player, is to press the eject button or the play button.
Infrared Remote Sensor: Located in the top center of the video display screen. Do not block the signal from the remote to the sensor.
Infrared Transmitters: Located in the top center of the video display screen. Do not block the signal from the headphones to the transmitter.
- Using the Uplevel RSE On-Screen Display (OSD) Menus
- Vehicle Speakers
- Wireless Headphones
- Remote Control
- Remote Control Buttons
- Playing Audio CD
- Playing MP3 CD
- Tips and Troubleshooting
- Cleaning the Video Screens
- Cleaning the Components
 Settings for Parental Control
Use the SETUP MENU to access the parental control feature. It allows for control
of the type of movie rating content (from G to Adult) that can be viewed and is
only accessible when no disc is loade ...
 Using the Uplevel RSE On-Screen Display (OSD) Menus
Use the OSD setup display menus for:
. General Setup
. Audio Setup
. Quality Setup
. Preference Setup
To use the OSD menus while using the DVD player or an auxiliary device:
1. Press the SETUP b ...
See also:
Accessory wheels and tires
Note: Use the diagram above to record accessory wheel and tire information.
1. Front tire pressure.
2. Rear tire pressure.
3. Wheel and tire information (size, speed rating, etc.).
WARNING
...
Maps
This section includes basic information that you need to know about the map database.
The maps are stored on a compact flash drive that is built into the navigation
system. ...
When Should an Airbag Inflate?
Frontal airbags are designed to inflate in moderate to severe frontal or near-frontal
crashes to help reduce the potential for severe injuries mainly to the driver's
or right front passenger' ...