


 Mercedes-Benz GL-Class: Opening and closing the side trimpanels
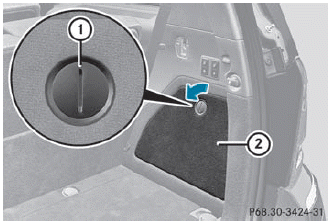
You must open the side trim panel in the cargo compartment before you can change the bulbs in the tail lamps.
Left-hand side trim panel
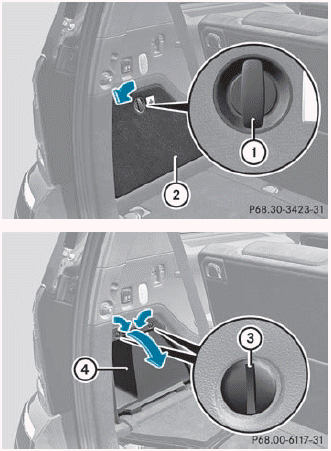
► To open: turn release knob 1 90° in the
direction of the arrow and remove side trim
panel 2.
► Insert a suitable object, e.g. a coin,
into the
slots of release knobs 3.
► Turn release knobs 3 90° in the direction
of the arrow and remove stowage
compartment 4.
► To close: insert stowage
compartment 4 and turn release
knobs 3 in the opposite direction to the
arrow until the slots on the release knobs
are in a vertical position.
► Insert side trim panel 2 and turn release knob 1 90° in the opposite direction to the arrow.
Right-hand side trim panel
► To open: insert a suitable object, e.g.
a
coin, into the slot of release knob 1 on
side trim panel 2.
► Turn release knob 1
90° in the direction
of the arrow and remove side trim
panel 2.
► To close: insert side trim panel ; and
turn
release knob 1 90° in the opposite
direction to the arrow.

 Tail lamps with LEDs
1 Rear fog lamp
2 Backup lamp
► Switch off the lights.
► Open the cargo compartment.
► Open the side trim panel.
► Turn the corresponding bulb holder
counter-clockwise ...
See also:
Engine compartment overview
1. Dynamic response fluid reservoir cap.
2. Brake fluid reservoir cap.
3. Engine oil filler cap.
4. Engine coolant filler cap.
5. Windshield washer fluid filler cap.
6. Power steering fluid fil ...
AM-FM Radio
Radio Data System (RDS)
The Radio Data System (RDS) feature is available for use only on FM stations
that broadcast RDS information. This system relies upon receiving specific information
from th ...
Glare from the side
► Fold down sun visor 1.
► Pull sun visor 1 out of retainer 3.
► Swing sun visor 1 to the side.
► Vehicles with a sliding sunroof: slide sun
visor 1 horizontally as desir ...