 Cadillac Escalade: Map Coordinates
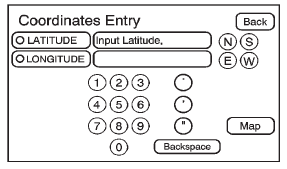
The coordinates destination entry method lets you select a destination by entering latitude and longitude coordinates.

Map Coordinates: Press to access the Coordinates Entry screen.
To use the coordinates destination entry method:
1. Press DEST.
2. Press From Map.
3. Press Map Coordinates.
4. Press Latitude and select either N (North) or S (South) to enter the direction of the latitude coordinate. Enter the numeric portion of the latitude coordinate.
5. Press Longitude and select either E (East) or W (West) next to enter the direction of the longitude coordinate. Enter the numeric portion of the longitude coordinate.
6. Once both coordinates are entered, press GO. The map screen, with the destination marked displays.
7. Select the route preference for Fastest, Shortest, or Other. The system calculates and highlights the route.
8. Press Start Guidance. The route is now ready to be started. See “Getting Started on Your Route” in this section for more information.
 From Map
This destination entry method allows you to select a destination by scrolling
on the map.
From Map: Press to enter the From
Map destination entry method.
To use this destination entry method:
...
 Preset Destination
The preset destination entry method lets you set a destination by selecting from
one of five previously stored destinations. Besides voice tagged destinations, these
are the only destinations availa ...
See also:
Remote operation
WARNING
The Smart Key can be operated from inside or outside the vehicle. It is therefore
important that it is kept out of the reach of children at all times.
WARNING
When operating the ...
Exterior mirrors
1. Left mirror adjustment.
2. Right mirror adjustment.
3. Press both switches together to fold/unfold the mirrors.
Note: If the mirrors are manually folded or knocked into the folded position
a ...
Seat belts
The seat belts can be cleaned by wiping
them with a sponge dampened in a mild
soap solution. Allow the belts to dry
completely before using them.
See “Seat belts” in the “1. Safety — s ...


