


 Range Rover: Storage compartments
![]() WARNING
WARNING
Ensure that any items stored in the vehicle are secure and cannot move. If the vehicle is involved in an accident, or subject to sudden braking or direction change, loose items can cause serious injury.
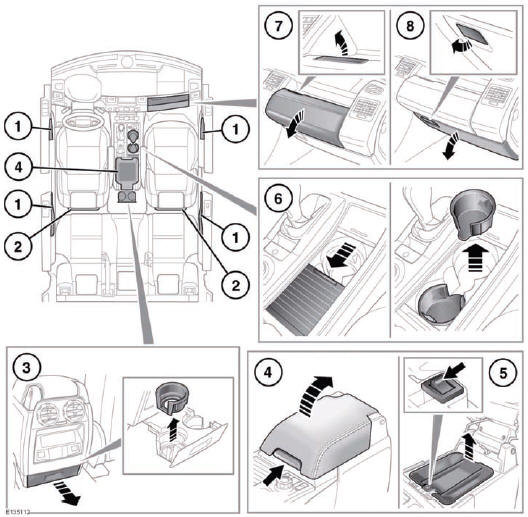
1. Storage bins.
2. Map pockets.
3. Rear seat cup holders: Pull out drawer to access. Lift out cup holder insert for cleaning.
4. Center console storage/cool box.
Note: The rubber matt at the bottom of the center console is designed to hold CD cases.
5. Cool box: Switch on and off using the switch on the inside front lip. There is a short delay between pressing the switch and illumination of the indicator.
The cool box will work best when the cooling tray is used.
Note: The cool box will only operate with the ignition turned on.
![]() NOTICE
NOTICE
The cool box should be switched off when it is not needed, to preserve battery charge.
6. Front cup holders: Slide open the panel to access. Lift the cup holder insert out for cleaning.
7. Glovebox.
8. Lower glovebox.
 Heated windshields
Heated windshield.
Heated rear glass.
Press button to operate the required screen heater. The screen heater(s) will
operate for a predetermined timed period before automaticall ...
 Auxiliary power sockets
1. Front power socket.
2. Rear power socket.
3. Loadspace power socket.
NOTICE
Only use Land Rover approved accessories. Using any other equipment may damage
the vehicle's electrical ...
See also:
Dimensions
...
Off-Road Recovery
The vehicle's right wheels can drop off the edge of a road onto the shoulder
while driving.
Follow these tips:
1. Ease off the accelerator and then, if there is nothing in the way, steer the ...
ADS (Adaptive Damping System)
ADS is continuously electronically-controlled.
It adapts the damping characteristics to suit
the current operating conditions. The
damping is controlled for each wheel
individually. This improve ...