


 Infiniti QX: Securing the load
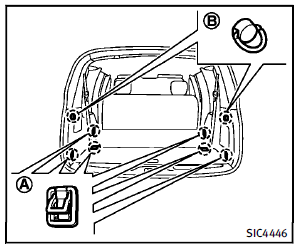
There are tie down hooks located in the cargo area as shown. The tie down hooks can be used to secure cargo with ropes or other types of straps.
Do not apply a total load of more than 22 lb (10 kg) to a single hookA or 7 lb (3 kg) to a single hook B when securing cargo.
 WARNING
► Properly secure all cargo with ropes or
straps to help prevent it from sliding or
shifting. Do not place cargo higher than the seatbacks. In a sudden stop or
collision, unsecured cargo could cause
personal injury.
► The child restraint top tether strap may
be damaged by contact with items in the
cargo area. Secure any items in the
cargo area. Your child could be seriously
injured or killed in a collision if the top
tether strap is damaged.
► Do not load your vehicle any heavier
than the GVWR or the maximum front
and rear GAWRs. If you do, parts of your
vehicle can break, tire damage could
occur, or it can change the way your
vehicle handles. This could result in loss
of control and cause personal injury.
 Vehicle load capacity
Do not exceed the load limit of your
vehicle shown as “The combined
weight of occupants and cargo” on
the Tire and Loading Information
label. Do not exceed the number of
occupants show ...
 Loading tips
► The GVW must not exceed GVWR
or GAWR as specified on the F.M.V.
S.S./C.M.V.S.S. certification label.
► Do not load the front and rear axle
to the GAWR. Doing so will exceed
the ...
See also:
Traction AA, A, B and C
The traction grades, from highest to lowest,
are AA, A, B and C. Those grades
represent the tire’s ability to stop on wet
pavement as measured under controlled
conditions on specified govern ...
Interior Care
To prevent dirt particle abrasions, regularly clean the vehicle's interior.
Immediately remove any soils. Note that newspapers or dark garments that can
transfer color to home furnishings can a ...
In-cabin microfilter
Models without Advanced Climate Control
System:
The climate control system is equipped
with an in-cabin microfilter which collects
dirt, pollen, dust, etc. To make sure the air
conditioner he ...