


 Cadillac Escalade: Programming Universal Home Remote — Fixed Code
For questions or help programming the Universal Home Remote System, call 1-866-572-2728 or go to www.learcar2u.com.
Most garage door openers sold before 1996 are Fixed Code units.
Programming a garage door opener involves time-sensitive actions, so read the entire procedure before starting. Otherwise, the device will time out and the procedure will have to be repeated.
To program up to three devices:
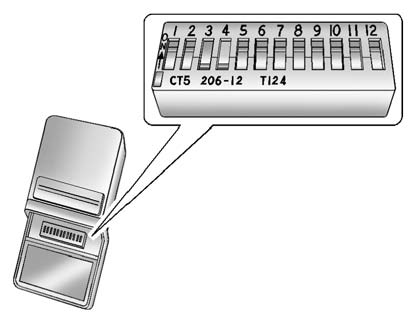
1. To verify that the garage door opener is a Fixed Code unit, remove the battery cover on the hand-held transmitter supplied by the manufacturer of the garage door opener motor. If there is a row of dip switches similar to the graphic above, the garage door opener is a Fixed Code unit. If you do not see a row of dip switches, return to the previous section for Programming Universal Home Remote — Rolling Code.
Your hand-held transmitter can have between 8 to 12 dip switches depending on the brand of transmitter.
The garage door opener receiver (motor head unit) could also have a row of dip switches that can be used when programming the Universal Home Remote.
If the total number of switches on the motor head and hand-held transmitter are different, or if the dip switch settings are different, use the dip switch settings on the motor head unit to program the Universal Home Remote. The motor head dip switch settings can also be used when the original hand-held transmitter is not available.
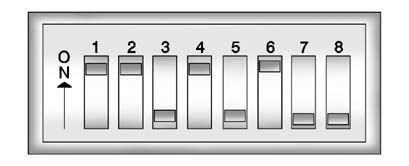
Example of Eight Dip Switches with Two Positions
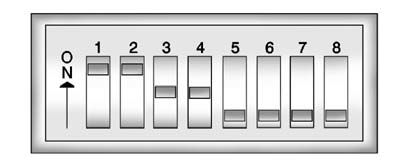
Example of Eight Dip Switches with Three Positions
The panel of switches might not appear exactly as they do in the examples above, but they should be similar.
The switch positions on the hand-held transmitter could be labeled as follows:
- A switch in the up position could be labeled as Up, +, or On.
- A switch in the down position could be labeled as Down, −, or Off.
- A switch in the middle position could be labeled as Middle, 0, or Neutral.
2. Write down the 8 to 12 switch settings from left to right as follows:
- When a switch is in the up position, write “Left.”
- When a switch is in the down position, write “Right.
- If a switch is set between the up and down position, write “Middle.”
The switch settings written down in Step 2 now become the button strokes to be entered into the Universal Home Remote in Step 4. Be sure to enter the switch settings written down in Step 2, in order from left to right, into the Universal Home Remote, when completing Step 4.
3. From inside your vehicle, first firmly press all three buttons at the same time for about three seconds. Release the buttons to put the Universal Home Remote into programming mode.
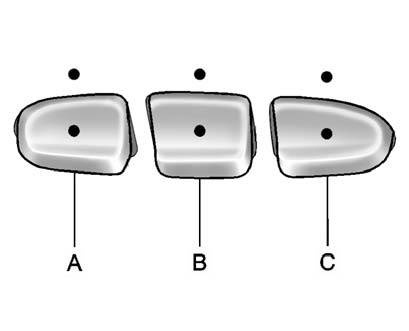
A. Left Button (Up, +, or On)
B. Middle Button (Middle, 0, or Neutral)
C. Right Button (Down, −, or Off)
4. The indicator lights will blink slowly. Enter each switch setting from Step 2 into your vehicle's Universal Home Remote.
You will have two and one-half minutes to complete Step 4. Now press one button on the Universal Home Remote for each switch setting as follows:
- If you wrote “Left,” press the left button (A) in the vehicle.
- If you wrote “Right,” press the right button (C) in the vehicle.
- If you wrote “Middle,” press the middle button (B) in the vehicle.
5. After entering all of the switch positions, once again firmly press and release all three buttons at the same time. The indicator lights will turn on.
6. Press and hold the button that will be used to control the garage door until the garage door moves. The indicator light above the selected button should slowly blink. This button may need to be held for up to 55 seconds.
7. Immediately release the button when the garage door moves. The indicator light will blink rapidly until programming is complete.
8. Press and release the same button again. The garage door should move, confirming that programming is successful and complete.
To program another Fixed Code device such as an additional garage door opener, a security device, or home automation device, repeat Steps 1-8, choosing a different button in Step 6 than what was used for the garage door opener.
 Programming Universal Home Remote — Rolling Code
For questions or help programming the Universal Home Remote System, call 1-866-572-2728
or go to www.learcar2u.com.
Most garage door openers sold after 1996 are Rolling Code units. Programming
a ga ...
 Universal Remote System Operation
Press and hold the appropriate button for at least half of a second. The indicator
light will come on while the signal is being transmitted.
Reprogramming Universal Home Remote Buttons
Any of the t ...
See also:
Automatic Door Locks
The vehicle may have an automatic lock/unlock feature. This feature can be programmed
using the Driver Information Center (DIC). See Vehicle Personalization
for more information on DIC p ...
IntelliBeam® Intelligent High-Beam Headlamp Control System
For vehicles with this feature, be sure to read this entire section before using
it.
IntelliBeam is an enhancement to the vehicle's headlamp system.
Using a digital light sensor on the rearview ...
Search area
The navigation map database is divided into countries, or geographically defined
areas within countries, that the navigation system recognises as search areas. When
setting a route, the destinatio ...