


 Range Rover: Main menu
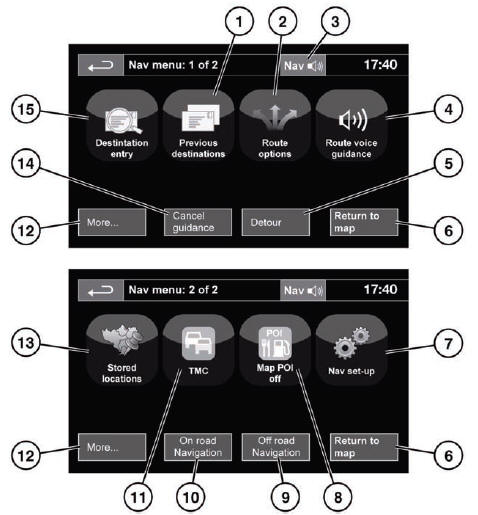
1. Previous destinations: Displays previous destinations entered.
2. Route options: Allows selection of various options for the route.
3. When a destination is set, the Range Rover logo is replaced by a soft key which
enables the last voice instruction to be repeated.
4. Route voice guidance: Allows the voice guidance messages to be turned off for
the current journey. The soft key is highlighted while voice guidance is enabled.
5. Detour: Allows a detour from the current route.
6. Return to map: Advances to the main map screen.
7. Nav set-up: Settings for the navigation system.
8. Map POI off: Turns the POI (Point Of Interest) icons on the map on/off.
9. Off road Navigation: Changes the system to Off road navigation mode.
10. On road Navigation: Changes the system to On road navigation mode.
11. TMC (Traffic Message Channel): Not used for entering a destination but, when
enabled, will provide data about road conditions and any events that may affect
the journey.
12. More...: Displays the other Nav menu screen.
13. Stored locations: Manages the stored locations.
14. Stop guidance: Cancels current route guidance.
15. Destination entry: Provides a choice of options for entering a destination.
 Using the navigation system
WARNING
In the interests of safety, only operate, adjust or view the system when it is
safe to do so.
WARNING
The navigation system is not a substitute for driving safely, with due care ...
 Map split screen
1. TMC (Traffic Message Channel) information.
2. Compass (always indicates north). Press to change style of icon.
3. Normal screen.
4. Next direction display.
5. Current vehicle position.
6. Ve ...
See also:
Selecting a radio station
SIRIUS XM satellite radio acts like a
normal radio.
For more information on satellite radio
operation, see the separate operating
instructions.
You can only change the waveband and store
ne ...
Side windows
Important safety notes
WARNING
When opening or closing the windows, make
sure there is no danger of anyone being
harmed by the opening/closing procedure.
The door windows are equipped ...
Lamp check
A bulb check is initiated for some warning lamps when the ignition is switched
on and lasts for 3 seconds (except for the air bag warning lamp which remains illuminated
until the engine is started ...