



 Mercedes-Benz GL-Class: Cargo compartment cover
Important safety notes
 When loading the vehicle, make sure that
you do not stack the load in the cargo
compartment higher than the lower edge of
the side windows. Do not place heavy
objects on top of the cargo compartment
cover.
When loading the vehicle, make sure that
you do not stack the load in the cargo
compartment higher than the lower edge of
the side windows. Do not place heavy
objects on top of the cargo compartment
cover.
The cargo compartment cover can be attached behind the second or third row of seats.
Extending and retracting the cargo compartment cover
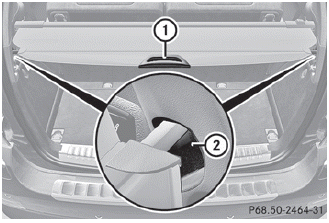
► To extend: pull the cargo compartment
cover back by grab handle 1 and clip it
into retainers 2 on the left and right.
► To retract: unhook the cargo compartment
cover from retainers 2 on the left and right
and guide it forwards by grab handle 1 until it is fully retracted.
Installing/removing the cargo compartment cover
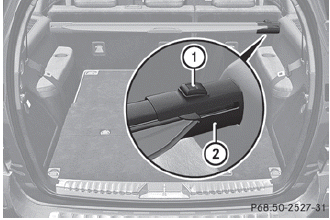
► To remove: make sure that cargo
compartment cover 2 is rolled up.
► Press button 1.
► Move cargo compartment cover 2 to the
left.
► Remove cargo compartment cover 2.
► To install: if installed, remove the
protective caps from the side trim in the
third row of seats when you wish to install cargo compartment cover 2 behind the
second row of seats.
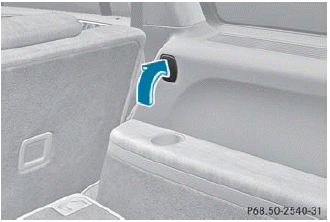
Protective cap in the right-hand side trim on the third row of seats
► Push in the top of the protective cap
as
indicated by the arrow.
The protective cap folds out at the bottom.
► Remove the lower cover from the side trim.
 Stow the protective caps in a safe place.
► With the handle of the cargo compartment
pointing to the rear and button 1 facing
upwards, insert cargo compartment
cover 2 into the recess of the side trim on
the left-hand side.
► Guide cargo compartment cover 2 in front
of the recess on the right.
► Press button 1 and insert the right-hand
side section into the recess of the side trim.
 Securing hooks
Only use the mounting hooks to secure items
of luggage up to maximum of 9 lbs (4 kg) in
weight.
There are two securing hooks 1 on each side
of the cargo compartment. ...
 Cargo net
Important safety notes
WARNING
Make sure the cargo net is properly engaged
at top and bottom position and the tightening
belts are securely fastened.
Never use a damaged cargo net.
A ...
See also:
Refueling
Fuel filler flap
The fuel filler flap is unlocked or locked
automatically when you open or close the
vehicle with the SmartKey or using KEYLESSGO.
The position of the fuel filler cap is displaye ...
Event Data Recorders
This vehicle has an Event Data Recorder (EDR). The main purpose of an EDR is
to record, in certain crash or near crash-like situations, such as an airbag deployment
or hitting a road obstacle, dat ...
Environmental Concerns
Always use established trails, roads, and areas that have been set aside
for public off-road recreational driving and obey all posted regulations.
Do not damage shrubs, flowers, trees, or grass ...


