


 Cadillac Escalade: Address Entry
 Address Entry: Enter either a city
or street to use the address entry destination method.
Address Entry: Enter either a city
or street to use the address entry destination method.
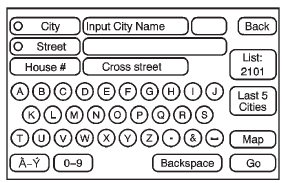
To enter a destination by inputting the city name first:
1. Press DEST.
2. Select  (Address Entry).
3. Select the state/province screen button, if needed, to change the current state or province. A list of all of the available states and provinces appear. Select the state or province.
4. Once a state or province has been selected the City name category is automatically selected for entry.
Enter the City Name or press the Last 5 Cities screen button.
The Last 5 Cities screen displays a list of the last five city names that had been entered. Select a city from the list and it appears in the City name area.
If using the alpha keyboard, finish entering the city name. If five or fewer names are available, a list displays. If more than five are available, the List screen button displays a number. This number represents the number of available cities. Press this button to view the list and select a city.
5. Once a city has been selected the Street name category is automatically selected for entry. Start entering the street name. If five or fewer names are available, a list displays. If more than five are available, the List screen button displays a number. This number represents the number of available streets. Press this button to view the list.
6. Once a street has been selected, press House to enter the house number. The system displays the house number range that is available for the street.
7. Press GO. The map screen, with the destination marked displays.
8. Select the route preference for Fastest, Shortest, or Other. The system calculates and highlights the route.
9. Press Start Guidance. The route is now ready to be started. See “Getting Started on Your Route” in this section for more information.
To enter a destination by entering the street name first:
1. Press DEST.
2. Select  .
.
3. Select the state/province screen button, if needed, to change the current state or province. A list of all of the available states and provinces appear. Select the state or province.
4. Select Street and start entering the street name or press the Last 5 Streets screen button.
If the street name is common, the city might need to be entered first.
The Last 5 Streets screen displays a list of the last five street names that had been entered. Select a street from the list and it appears in the Street name area.
If using the alpha keyboard, finish entering the street name. If five or fewer names are available, a list displays. If more than five are available, the List screen button displays a number. This number represents the number of available streets. Press this button to view the list and select a street.
5. Once a street has been selected, select House to enter the house number. The system displays the house number range that is available for the street.
6. Once the house number is selected, the city name automatically populates. If there is more than one city available for selection, a list of cities display. Select the city.
7. Press GO. The map screen, with the destination marked displays. 8. Select the route preference for Fastest, Shortest, or Other. The system calculates and highlights the route.
9. Press Start Guidance. The route is now ready to be started. See “Getting Started on Your Route” in this section for more information.
To enter a destination by entering a cross street:
1. Press DEST.
2. Press  .
.
3. Select the state/province screen button, if needed, to change the current state or province. A list of all of the available states and provinces appear. Select the state or province.
4. Select Street and start entering the street name or press the Last 5 Streets screen button. If the street name is common, the city might need to be entered first.
The Last 5 Streets screen displays a list of the last five street names that had been entered. Select a street from the list and it appears in the Street name area.
If using the alpha keyboard, finish entering the street name. If five or fewer names are available, a list displays. If more than five are available, the List screen button displays a number. This number represents the number of available streets. Press this button to view the list and select a street.
5. Once a street has been selected, select Cross Street and start entering the cross street name. If five or fewer names are available, a list displays. If more than five are available, the List screen button displays a number. This number represents the number of available streets. Press this button to view the list and select a street.
6. Press GO. The map screen, with the destination marked displays.
7. Select the route preference for Fastest, Shortest, or Other. The system calculates and highlights the route.
8. Press Start Guidance. The route is now ready to be started.
See “Getting Started on Your Route” in this section for more information.
 Destination
Press DEST to access the Destination Entry screen. From this screen, you can
select from several options to plan a route by entering destination points.
To enter a destination, choose from one of ...
 Point of Interest (POI)
The Point of Interest (POI) destination entry method lets you select a destination
from the POI list.
Point of Interest: Press to access
the POI (Point of Interest) screen. From this screen you ...
See also:
Parental Control
The RSE system may have a Parental Control feature, depending on which radio
the vehicle has. To start Parental Control, press and hold the radio power button
for more than two seconds to stop all s ...
General Towing Information
Only use towing equipment that has been designed for the vehicle. Contact your
dealer or trailering dealer for assistance with preparing the vehicle for towing
a trailer. See the following trailer t ...
Airbag System Messages
SERVICE AIR BAG
This message displays if there is a problem with the airbag system.
Have your dealer inspect the system for problems. See Airbag Readiness Light
and Airbag System for m ...