


 Cadillac Escalade: Tire and Loading Information Label
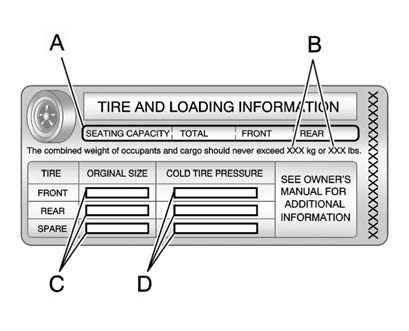
Label Example
A vehicle specific Tire and Loading Information label is attached to the center pillar (B-pillar). With the driver door open, you will find the label attached below the door lock post (striker). The tire and loading information label shows the number of occupant seating positions (A), and the maximum vehicle capacity weight (B) in kilograms and pounds.
The Tire and Loading Information label also shows the size of the original equipment tires (C) and the recommended cold tire inflation pressures (D). For more information on tires and inflation see Tires and Tire Pressure .
 Vehicle Load Limits
It is very important to know how much weight your vehicle can carry. This weight
is called the vehicle capacity weight and includes the weight of all occupants,
cargo, and all nonfactory-installed o ...
 There is also important loading information on the vehicle Certification/Tire
label. It tells you the Gross Vehicle Weight Rating (GVWR) and the Gross Axle Weight
Rating (GAWR) for the front and rea
There is also important loading information on the vehicle Certification/Tire
label. It tells you the Gross Vehicle Weight Rating (GVWR) and the Gross Axle Weight
Rating (GAWR) for the front and rea
Steps for Determining Correct Load Limit
1. Locate the statement “The combined weight of occupants and cargo should never
exceed XXX kg or XXX lbs” on your vehicle's placard.
2. Determine t ...
See also:
Gradient release control (GRC)
With HDC activated, if the vehicle is stopped on a slope using the foot brake,
GRC will become active (except in Terrain response Sand program). During a hill
ascent when the foot brake is release ...
If your vehicle overheats
CAUTION
► Do not continue to drive if your vehicle
overheats. Doing so could cause engine
damage or a vehicle fire.
► To avoid the danger of being scalded,
never remove the rad ...
System fault
If a fault is detected in the HDC system, HDC FAULT SYSTEM NOT AVAILABLE will
appear in the message center.
If the fault is detected while the system is operating, HDC assistance will fade
out.
...