


 Mercedes-Benz GL-Class: SmartKey battery
Important safety notes
It is advisable to have batteries replaced at a qualified specialist workshop, e.g. at an authorized Mercedes-Benz Center.
WARNING ![]()
Batteries contain toxic and caustic
substances. For this reason, keep batteries
out of the reach of children.
If a battery has been swallowed, seek medical
help immediately.
WARNING ![]()
The SmartKey batteries contain perchlorate
material, which may require special handling
and regard for the environment. Observe
government disposal guidelines. California
residents, see www.dtsc.ca.gov/HazardousWaste/Perchlorate/index.cfm.
Checking the battery
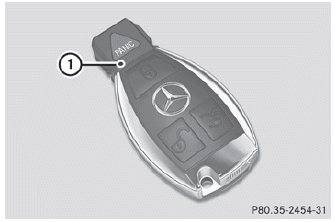
► Press the
 button.
The SmartKey battery is working properly if battery check lamp 1 lights up briefly.
If battery check lamp 1 does not light up briefly during the test, the SmartKey battery is discharged.
► Changing the battery
 The battery can be obtained from any
authorized Mercedes-Benz Center.
The battery can be obtained from any
authorized Mercedes-Benz Center.
If the SmartKey battery is checked within
the signal reception range of the vehicle,
pressing the button locks or
unlocks the vehicle.
Changing the battery
You require a CR 2025 3 V cell battery.
► Take the mechanical key out of the SmartKey.
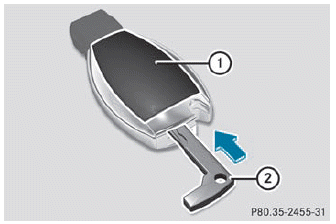
► Press mechanical key 2 into the opening in the SmartKey in the direction of the arrow until battery tray cover 1 opens.
When doing so, do not hold cover 1 shut.
► Remove battery tray cover 1.
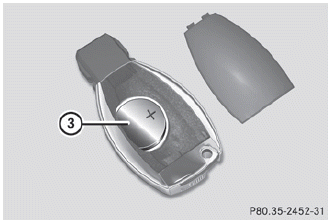
► Repeatedly tap the SmartKey against
your
palm until battery 3 falls out.
► Insert the new battery with the positive
terminal facing upwards. Use a lint-free
cloth to do so.
► Make sure that the surface of the battery
is
free from lint, grease and all other forms of
contamination.
► Insert the front tabs of battery tray
cover 1 and then press to close it.
► Insert the mechanical key into the
SmartKey.
► Check the function of all SmartKey buttons
on the vehicle.
 Mechanical key
General notes
If the vehicle can no longer be unlocked with
the SmartKey, use the mechanical key.
If you use the mechanical key to unlock and
open the driver's door, the anti-theft alarm
system ...

See also:
Reprogramming a single HomeLink® button
To reprogram a HomeLink® Universal
Transceiver button, complete the following.
1. Push and hold the desired HomeLink®
button. Do not release the button until
step 4 has been completed.
2. ...
Rear Window Wiper/Washer
The rear wiper and rear wash button is located on the instrument panel below
the climate control system.
(Rear Wiper): Press to turn the
rear wiper on and off. The wiper speed cannot be changed. ...
Sunroof
A. Open or Close
B. Vent
On vehicles with a sunroof, the sunroof only operates when the ignition is in
the ACC/ACCESSORY or ON/RUN, or when Retained Accessory Power (RAP) is active. See
Retained ...