


 Infiniti QX: iPod® player operation
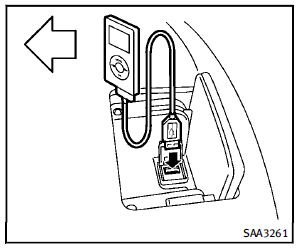
Connecting iPod®
Open the tray lid and connect the iPod® cable to the USB connector. If the iPod® supports charging via USB, the battery of the iPod® will be charged while connected to the vehicle. Depending on the version of the iPod®, the display on the iPod® shows an INFINITI or Accessory Attached screen when the connection is completed. When the iPod® is connected to the vehicle, the iPod® music library can only be operated by the vehicle audio controls. iPod® is a trademark of Apple Inc., registered in the U.S. and other countries.
Compatibility
The following models are available:
► Fifth generation iPod® (version 1.2.3 or
later)
► iPod Classic® (version 1.1.1 or later)
► First generation iPod touch® (version
2.0.0 or later)
► Second generation iPod touch® (version
1.2.3 or later)
► First generation iPod nano® (version
1.3.1 or later)
► Second generation iPod nano® (version
1.1.3 or later)
► Third generation iPod nano® (version
1.1 or later)
► Fourth generation iPod nano® (version
1.0.2 or later)
This unit may not control/operate correctly when connected to some iPod® versions/ firmware and iPhone. Make sure that the iPod® version is updated.
Audio main operation
Push the ignition switch to the ACC or ON position. Then, push the DISC·AUX button repeatedly to switch to the iPod® mode. If the system has been turned off while the iPod® was playing, pushing the ON·OFF button will start the iPod®.
 PLAY:
PLAY:
When the DISC·AUX button is pushed with the system off and the iPod® connected, the system will turn on. If another audio source is playing and the iPod® is connected, push the DISC·AUX button repeatedly until the center display changes to the iPod® mode.
Interface:
The interface for iPod® operation shown on the vehicle center display is similar to the iPod® interface. Use the INFINITI controller and the ENTER or BACK button to play the iPod® with your favorite settings. The following items can be chosen from the menu list screen. For further information about each item, see the iPod® Owner’s Manual.
► Now Playing
► Playlists
► Artists
► Albums
► Songs
► Podcasts
► Genres
► Composer
► Audiobooks
► Shuffle Songs
The following touch-panel buttons shown on the screen are also available:
 returns to the previous screen.
 plays/pauses the music selected.
 Next/Previous Track and Fast
Forward/Rewind:
Next/Previous Track and Fast
Forward/Rewind:
When the  button is pushed for
more than 1.5 seconds while the iPod® is
playing, the iPod® will play while fast
forwarding or rewinding. When the button
is released, the iPod® will return to the
normal play speed.
When the
button is pushed for
more than 1.5 seconds while the iPod® is
playing, the iPod® will play while fast
forwarding or rewinding. When the button
is released, the iPod® will return to the
normal play speed.
When the  button is pushed for
less than 1.5 seconds while the iPod® is
playing, the next track or the beginning of
the current track on the iPod® will be
played.
button is pushed for
less than 1.5 seconds while the iPod® is
playing, the next track or the beginning of
the current track on the iPod® will be
played.
When the rewind button is pushed for less than 1.5 seconds within 3 seconds after the current track starts playing, the previous track will be played. The INFINITI controller can also be used to select tracks when the iPod® is playing.
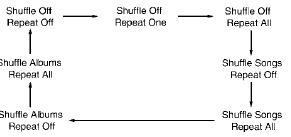
 Play pattern change:
When the  button is pushed while
a
track is being played, the play pattern can
be changed as follows:
button is pushed while
a
track is being played, the play pattern can
be changed as follows:
 Bluetooth® streaming audio
Your INFINITI is equipped with Bluetooth®
Streaming Audio. If you have a compatible
Bluetooth® device with streaming audio
(A2DP profile), you can set up the wireless
connection between your ...
 Music Box® (if so equipped)
The Music Box® audio system can store
songs from CD being played. The system
has a 9.3 gigabyte (GB) storage capacity.
The following CDs can be recorded in the
Music Box® audio system.
...
See also:
Trailer electrical connection
NOTICE
Only connect approved electrical circuits, which are in good condition, to the
trailer socket.
When a trailer electrical connection is made, and the vehicle’s direction indicators ...
Adding or Changing Preset Destinations
This feature allows additions or changes one of five preset destinations. When
a destination has been added as a preset destination, it is available to select
from the Destination Entry screen. See ...
Intelligent Key operation
You can lock or unlock the doors without
taking the key out from your pocket or bag.
When you carry the Intelligent Key with
you, you can lock or unlock all doors by
pushing the door handle ...